.jpg?ph=3cb910822d)
Amber Glass Projects
Supplies for Amber Glass Projects
Clear Glass Bottle with Cork
Clear Flat Glass Ornament
Clear Glass Plate
Tall, Narrow Glass (optional)
PermEnamel Surface Conditioner
Delta - Iridescent Permenamels in Amber and in White Gold
Transparent PermEnamel in Yellow
Delta – PermEnamel Black Accent Liner
PermEnamel Gloss Glaze
Palette paper or waxed paper
Embellishments, including beads, old earrings, scrap paper, etc; whatever found objects you want to add.
Paper towels
Free Glass Painting Pattern Instructions
1. As always, glass items are washed, rinsed and dried well.
2. A coat of the Step 1 Surface Conditioner is applied and allowed to dry. Thankfully, it doesn't take long!
3. We started with an inexpensive glass jar with a cork stopper (see photo). Because we used a drip method, the jar was positioned on top of a small lid to keep it elevated.
4. Each Iridescent PermEnamel comes in a squeezable, plastic bottle with a narrow tip. Beginning at the neck of the jar, we drizzled Amber, White/Gold and Yellow randomly.
We watched with fascination as the drips trickled down the sides of the jar. Then we drizzled more color over a previous color or where blank spots were left here and there.
We recommend rotating the jar carefully while playing! Come to think of it, a lazy Susan would come in real handy!
The fun of providing these free glass painting patterns is all the experimenting we get to do too!
5. As we watched the jar, we noticed another wonderful thing happening on the paper underneath. The different colors were mingling together to create this wonderful puddle that looked like iridescent marble. That's when we all heck broke loose! We didn’t want anything to go to waste!
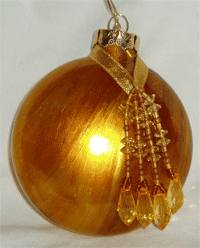
6. So next ... a glass ornament (see photo) was dipped right into the paint puddle. Then we simply scooped paint up with a flat brush and drizzled it along the top to finish covering the surface.
Now just a word of advice ... before you do this. It's a lot easier if you remove the hanger thingy and place something like a wooden skewer into the opening first.
Then when you're done, you can poke the stick into a piece of Styrofoam. That way the paint can drip off freely. Of course, feel free to come up with your own ingenious plan.
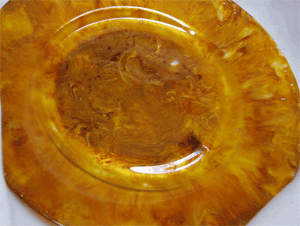
7. There was still a lot of our iridescent puddle left, so we grabbed a glass plate... and thought ... why not set the back of the glass plate down into the remaining mixture? Well, this caused the paint and palette paper to stick to the plate. Uh oh! Think fast!! So we carefully inverted the plate (elevated) onto a sturdy piece of cardboard then continued to pat the mixture from the palette paper until the back of the plate was completely covered.
The results, as you can see were gorgeous! So we put the plate aside and shooed the pets out of the room. Too many disaster possibilities at this stage!
8. But wait ... there's still paint left... so we lay the palette paper down on the table (paint side up of course) :o). Taped off 1" around the lip of a tall, narrow glass and rolled it in the paint. The paper wrapped around the glass as we rolled. So we gingerly unrolled and gently peeled the paper back. Just amazing! No mess, just a happy accident! (not shown)
9. After letting everything dry for 10 days, we applied the PermEnamel Gloss Glaze to protect our hard work.
10. To decorate our new pieces of art, we strung an old necklace with a single, discarded earring around the neck of the jar. A cut out piece of vellum with a vintage lady's face was cut and glued to the top of the cork, then a thin line of Black Accent Liner was used to finish around the edge.
11. As for the ornament all we did there was to add a purchased doo-dad to the top. Simple yet elegant, wouldn’t you agree?